Successful projects don’t happen by chance.
They’re built on clear goals, aligned teams, and decisions that are made before things get messy.
In my experience leading cross-functional projects, one thing has become clear: Project planning isn’t just a phase to “get through.” It’s the foundation for everything that follows.
When done right, a project plan isn’t just a document. It’s a communication tool. It sets direction, creates accountability, and gives your team the confidence to execute without second-guessing every step.
This guide will show you the exact project planning steps to building that plan. When you plan clearly, you don’t just manage projects — you lead them.
Let’s dive in.
What Is Project Planning?
Techopedia defines project planning as –
“…a procedural step in project management, where required documentation is created to ensure successful project completion.”
This ‘documentation’ includes all additional steps and actions required to plan the project successfully. The project plan must clearly define how the project should be executed, tracked, and wrapped up.
In fact, it is the second step in the lifecycle of a project, after the ‘project initiation’ phase.
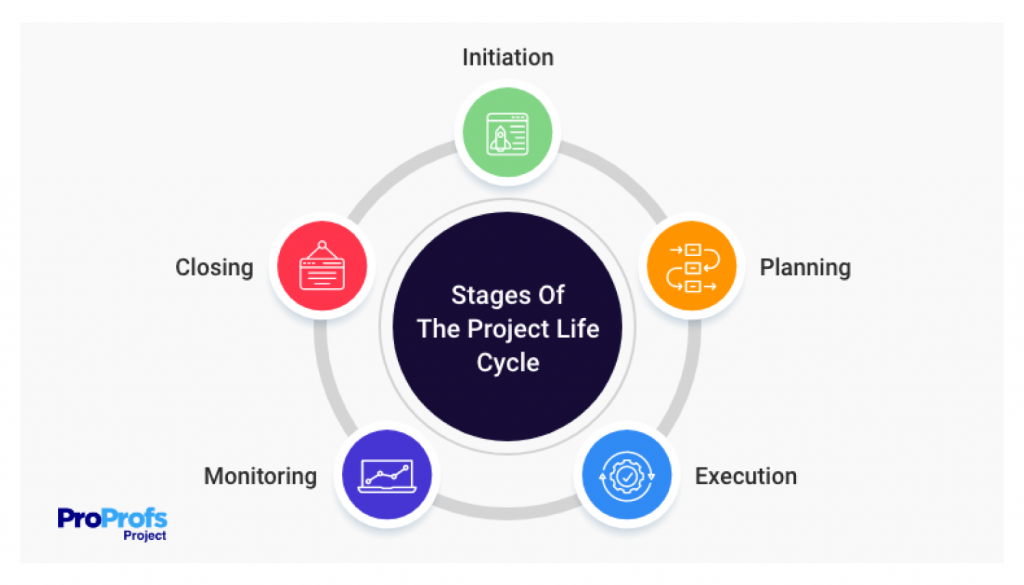
Having a definite plan before starting a project acts like a treasure map. Precise project planning in entrepreneurship and large businesses ensures that you do not waste time and effort on elements like resource utilization, communication, etc., after project execution.
Project Planning Guide: What to Include in Your Project Plan
Before I share some of the best practices in a step-by-step manner, here’s a rule of thumb – make sure that the project plan is clear and provides clarity to your team.
That is a non-negotiable because, after the planning phase, the project moves to execution. And it’s not ideal to have too many changes/roadblocks, as that can hinder deliverability. Let’s not get straight to the steps.
#1 Project Initiation: Securing the Go-Ahead
You can’t dive into planning without first getting the green light. This is where the project officially begins, often through a project charter or approval from key decision-makers.
What that looks like can vary. For some, it’s a simple yes from leadership. For others, it might mean a kickoff meeting, legal review, or client sign-off.
If you’re coordinating across teams or transitioning from spreadsheets and manual tools, clear alignment at the project initiation stage helps avoid confusion and rework later.
It’s also the time to rally stakeholder support. For that. You need to show what problem you’re solving, why it matters now, and how it connects to their goals and early wins.
#2 Scope Definition: Keeping Your Focus
“What objectives are we trying to achieve?” – should be the first question in your mind when defining the project’s scope and objectives.
Clarify the project’s deliverables and boundaries before diving into the details to keep everyone aligned and help prevent scope creep, which causes delays and exceeds the budget.
Otherwise, estimating time, assigning resources, and collaborating effectively across teams will become more challenging.
However, the scope can look very different depending on your environment. That’s why I suggest discussing the core project scope with stakeholders –

#3 Work Breakdown Structure: Breaking Down the Big Tasks
Ever feel overwhelmed by a big project? That’s where the Work Breakdown Structure, or WBS, comes in. It helps break significant goals into smaller, more manageable chunks. For example, turning “launch campaign” into tasks like “write copy,” “design visuals,” and “set up analytics.”
WBS is often visualized like a tree, with your primary goal as the trunk and tasks branching out. As you break things down, consider where complexity appears, such as during handoffs, approvals, or external reviews. Be sure to mark those as checkpoints.
Once built, here’s what to do for maximum clarity:
- Map tasks into a Gantt chart to set timelines and dependencies.
- Assign owners in a Kanban board for visibility.
A clear breakdown makes it easier to prioritize, track progress, and adapt as the project evolves.
#4 Resource Estimating: Knowing Who Does What
Resources keep your project moving — people, tools, equipment, and software all play a role. Constraints like time, budget, and availability can limit what’s possible, so estimating them well is key.
This step involves determining the effort required for each task, who is best suited to do it, and when they’ll be available. In some environments, roles are flexible. In others, availability may depend on vendor contracts, certifications, or compliance.
Working with remote or distributed teams? Then visibility becomes key. While allocating work, it’s important to consider differences in time zones, availability windows, and communication habits. Clarifying expectations and tracking workloads centrally helps avoid burnout and misalignment.
To plan resources effectively, you will need a resource management tool. Such a software solution will help you track all resources in one place, plan ahead with time tracking, estimate costs, generate invoices, and so on.
#5 Realistic Timeline: Putting Time on Your Side
Now that you’ve mapped out tasks and resources, it’s time to bring everything together on a project timeline. Think of it like scheduling appointments in your calendar, but for your entire project.
This step involves more than just picking dates. It involves understanding task dependencies, identifying the critical path, and marking key milestones. Scheduling tools like Gantt charts are great for visualizing how everything fits together, especially when managing overlapping tasks across teams.
Watch this video to understand and implement them better:
Here’s what you need to remember when setting timelines:
- Account for Industry Timelines: Seasonal demand, procurement delays, or approval cycles can quietly influence your project schedule—build in buffer time where needed.
- Set a Unified Timeline: Use a shared timeline to keep departments and clients on the same page, improve visibility, and reduce mid-project surprises.
#6 Cost Budgeting: Counting Every Penny
Every project has costs. Budgeting means building a financial plan that covers all expected expenses — not just salaries but also software licenses, vendor fees, materials, travel, and client billables.
In some cases, certain costs, such as grant-funded items, billable hours, or capped budgets, require stricter tracking and reporting. Understanding which expenses need that extra detail early can help you avoid financial issues and surprises later.
A clear budget keeps your project focused and your team aligned. Financial transparency matters as much as timelines for projects involving clients or multiple departments. That’s where tools like ProProfs Project can help by bringing time tracking, per-task budgeting, and invoicing into one place.
Need some tips to get started? No worries, here are some for you –
- Estimate the cost for each task, considering labor, materials, and other resources.
- Compile the estimated costs to create a budget, including a detailed account of all expected expenses.
- Set aside a contingency fund to cover unexpected costs or overruns, typically a percentage of the total budget.
- Regularly track actual spending against the budget and adjust as necessary to stay on track.
#7 Risk Management: Preparing for the Unexpected
“I bet nothing can go wrong! We planned it so religiously, after all.”
If that’s your inner voice before a new project, brace yourself. Even the most well-planned projects hit unexpected bumps, from tech glitches to delayed approvals or missing materials.
The goal isn’t to eliminate risk but to reduce the fallout. Start by identifying what could go wrong, assessing the impact, and preparing responses.
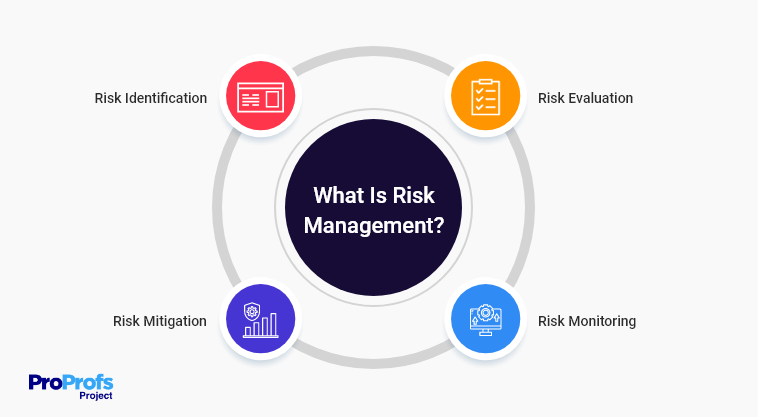
Here’s what your risk management plan should include –
- Conduct thorough risk assessments and engage with all stakeholders to understand different perspectives.
- Evaluate the impact of identified risks using tools like SWOT analysis, risk matrices, or Monte Carlo simulations.
- Arrange risks based on their severity and the urgency of addressing them.
- Create strategies for each risk, deciding whether to avoid, mitigate, accept, or transfer them.
Projects often shift during execution. So, you should have a risk-aware mindset and a consistent risk approach across teams. This can help reprioritize quickly and manage task dependencies more confidently when things change.
#8 Communication Plan Development: Keeping Everyone Informed
| “The more we learn about effective communication, the better we’ll be at leading, as our directives will be better understood.” – Paul Jarvis, author and designer. |
Communication should be seamless among people invested in the project’s outcome – team members, project managers, stakeholders, etc. This includes determining –
- Frequency: How often will updates be communicated? (e.g., Daily, weekly)
- Channels: What communication tools will be used? (e.g., Team meetings, project management software)
- Roles: Who is responsible for providing updates? (e.g., Project manager, team leads)
An effective communication plan ensures everyone knows what’s happening when it’s happening, and what changes might be on the horizon.
Although there are communication tools like Google Meet, Skype, and so on, I prefer team communication software more. The most obvious reason is that you can communicate and collaborate even when working, and you don’t need to switch platforms for menial stuff like tagging someone, adding comments, sharing files, and so on.
If your project spans roles or regions, use a mix of chats and reports to keep team communication clear.
#9 Documenting the Project Plan: Creating a Single Source of Truth
Creating a project plan is only half the job. If it’s not documented clearly, confusion sets in and execution suffers.
Pull everything into one accessible document—your single source of truth. This keeps teams and stakeholders aligned from start to finish.
Your plan should cover:
- Project Overview – goals, stakeholders, timelines
- Scope & Deliverables – what’s in and out
- Work Breakdown Structure – tasks and dependencies
- Resources & Budget – who’s doing what, at what cost
- Risks – potential issues and responses
- Communication Plan – how and when updates will be shared
Pro Tip: Use a tool like ProProfs Project to organize tasks, assign roles, track progress, and attach documents—all in one place. You can also turn complete plans into reusable templates for faster project planning in the future.
How to Create a Project Plan Using a Ready-Made Template
Now that you know the major components of a successful project plan, let’s walk through how to create one using a ready-made template in ProProfs Project. I promise it’s super easy and will simplify planning, streamline collaboration, and help you stay on track.
Step 1: Design a Project
Create an account or log in to ProProfs Project. Now, quickly click on “Add Project” and select “ New Project.” Next, use the “Design Project Plan” template.
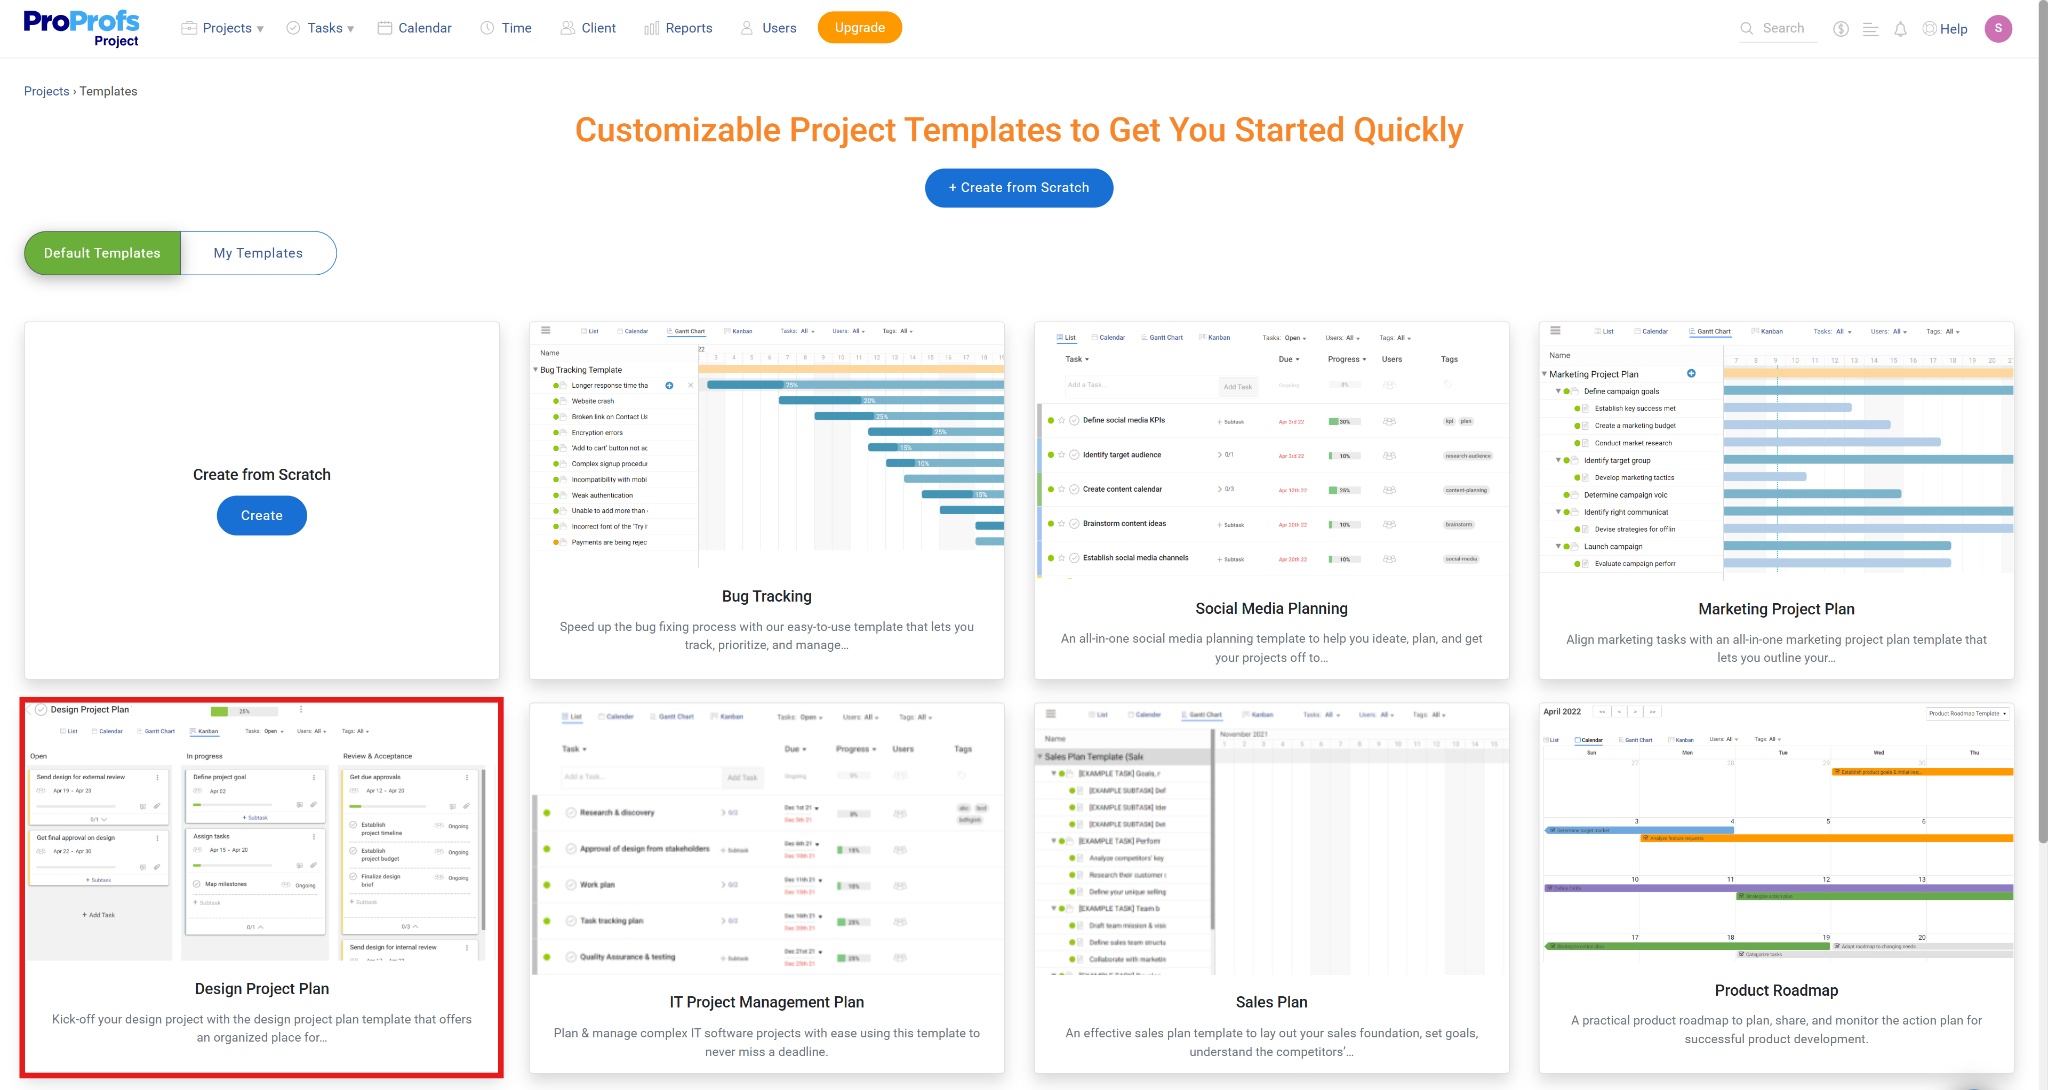
Here you can also add the team or individuals who’ll be working on the project by clicking on users on the right side of the dashboard.
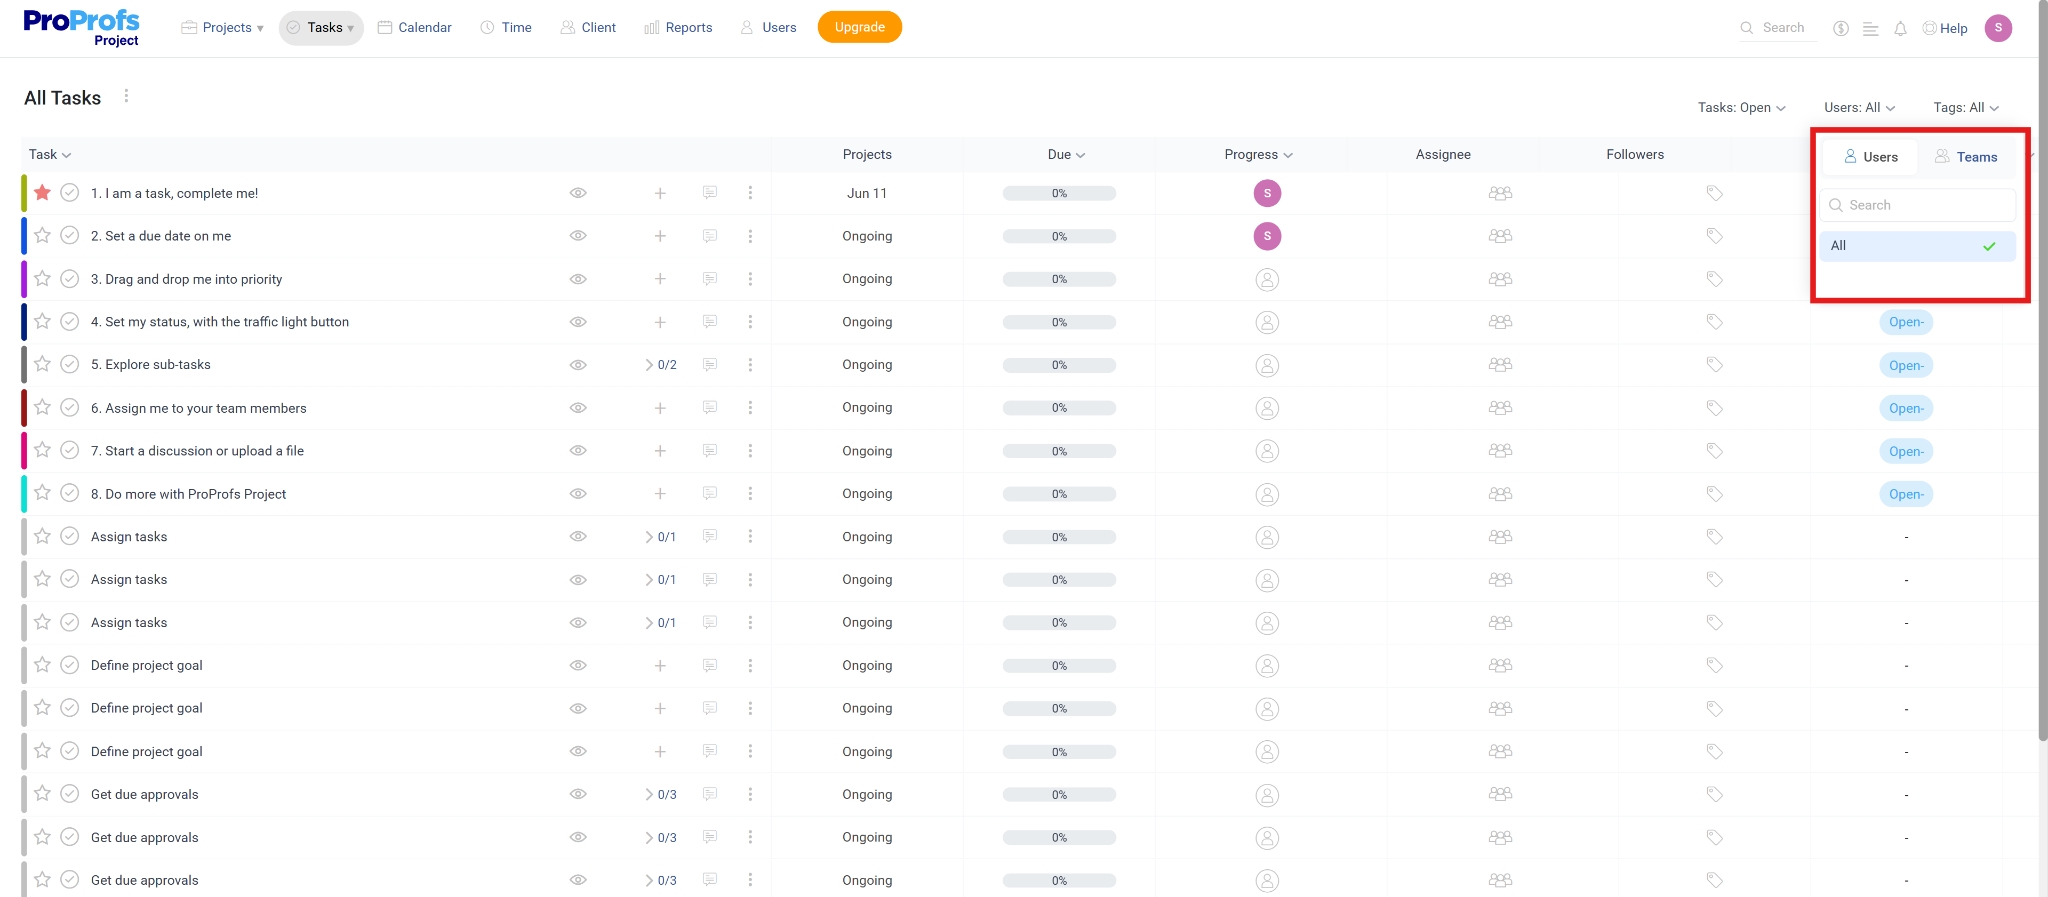
Step 2: Create & Assign Tasks
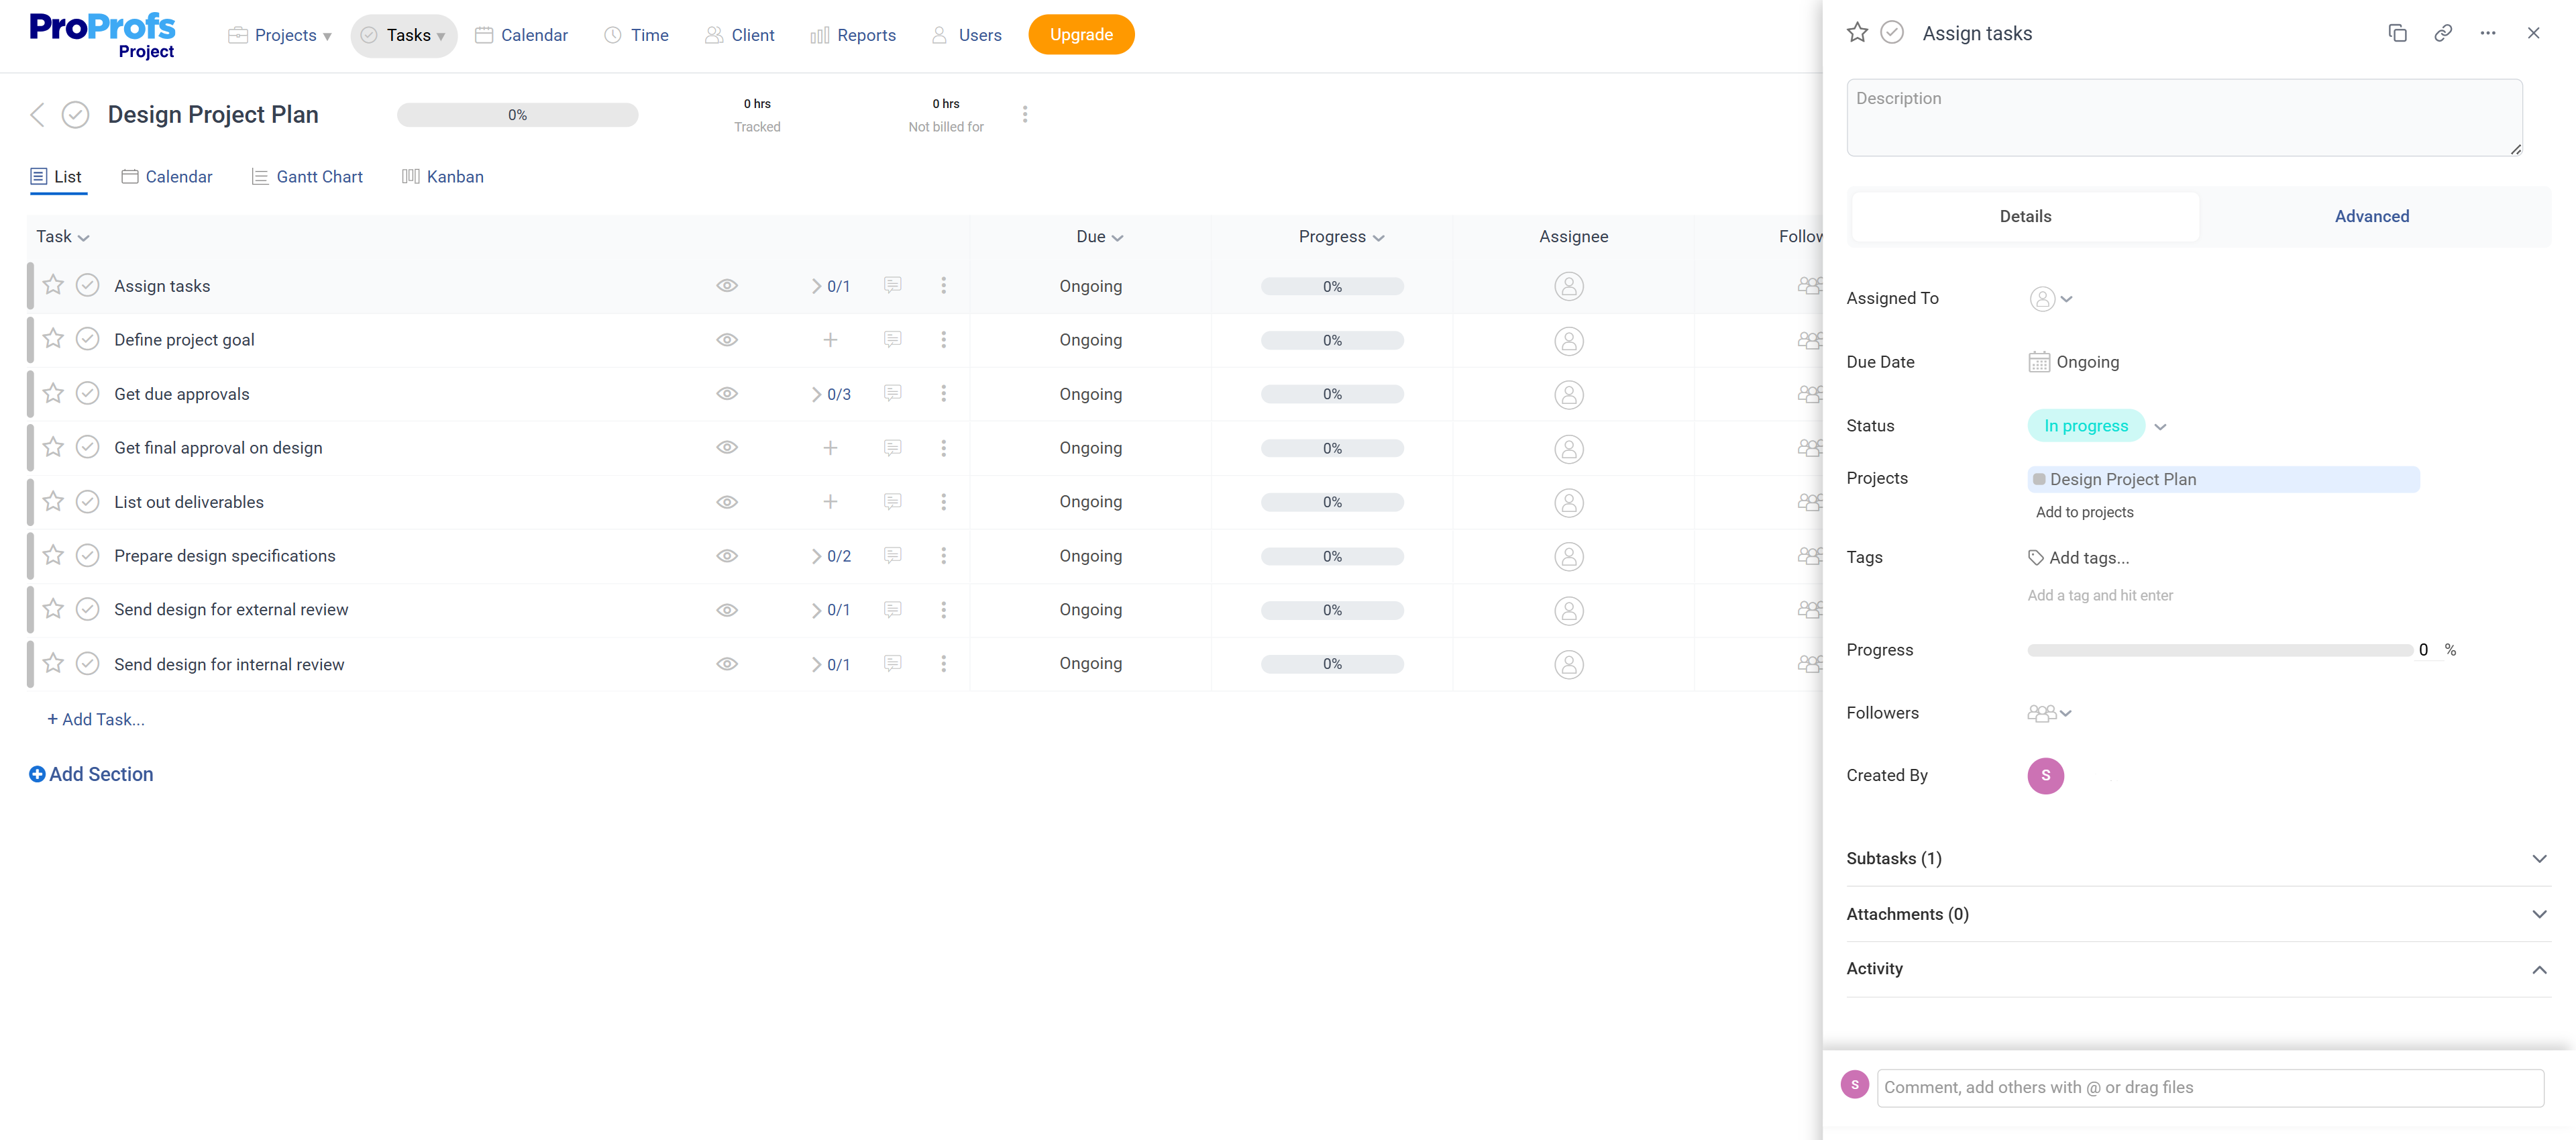
In the project dashboard, you’ll see pre-designed, customizable tasks. To add an additional task, simply create a new task by clicking on the “add task” option. Now, click on each task to outline the due date, starting date, tags, status, estimated duration, and progress for better management.
Next, assign tasks to team members based on their skills and availability. When you clearly define each person’s responsibilities, confusion is less likely to happen later.
Remember: If your project involves clients or external contributors (like consultants or vendors), you can give access to specific tasks in ProProfs Project. This allows them to view relevant updates or comment on assigned tasks, without accessing sensitive internal data.
You can also set task priority by simply dragging them up or down the list. Or add custom fields to track any unique information, like project risks and budget.
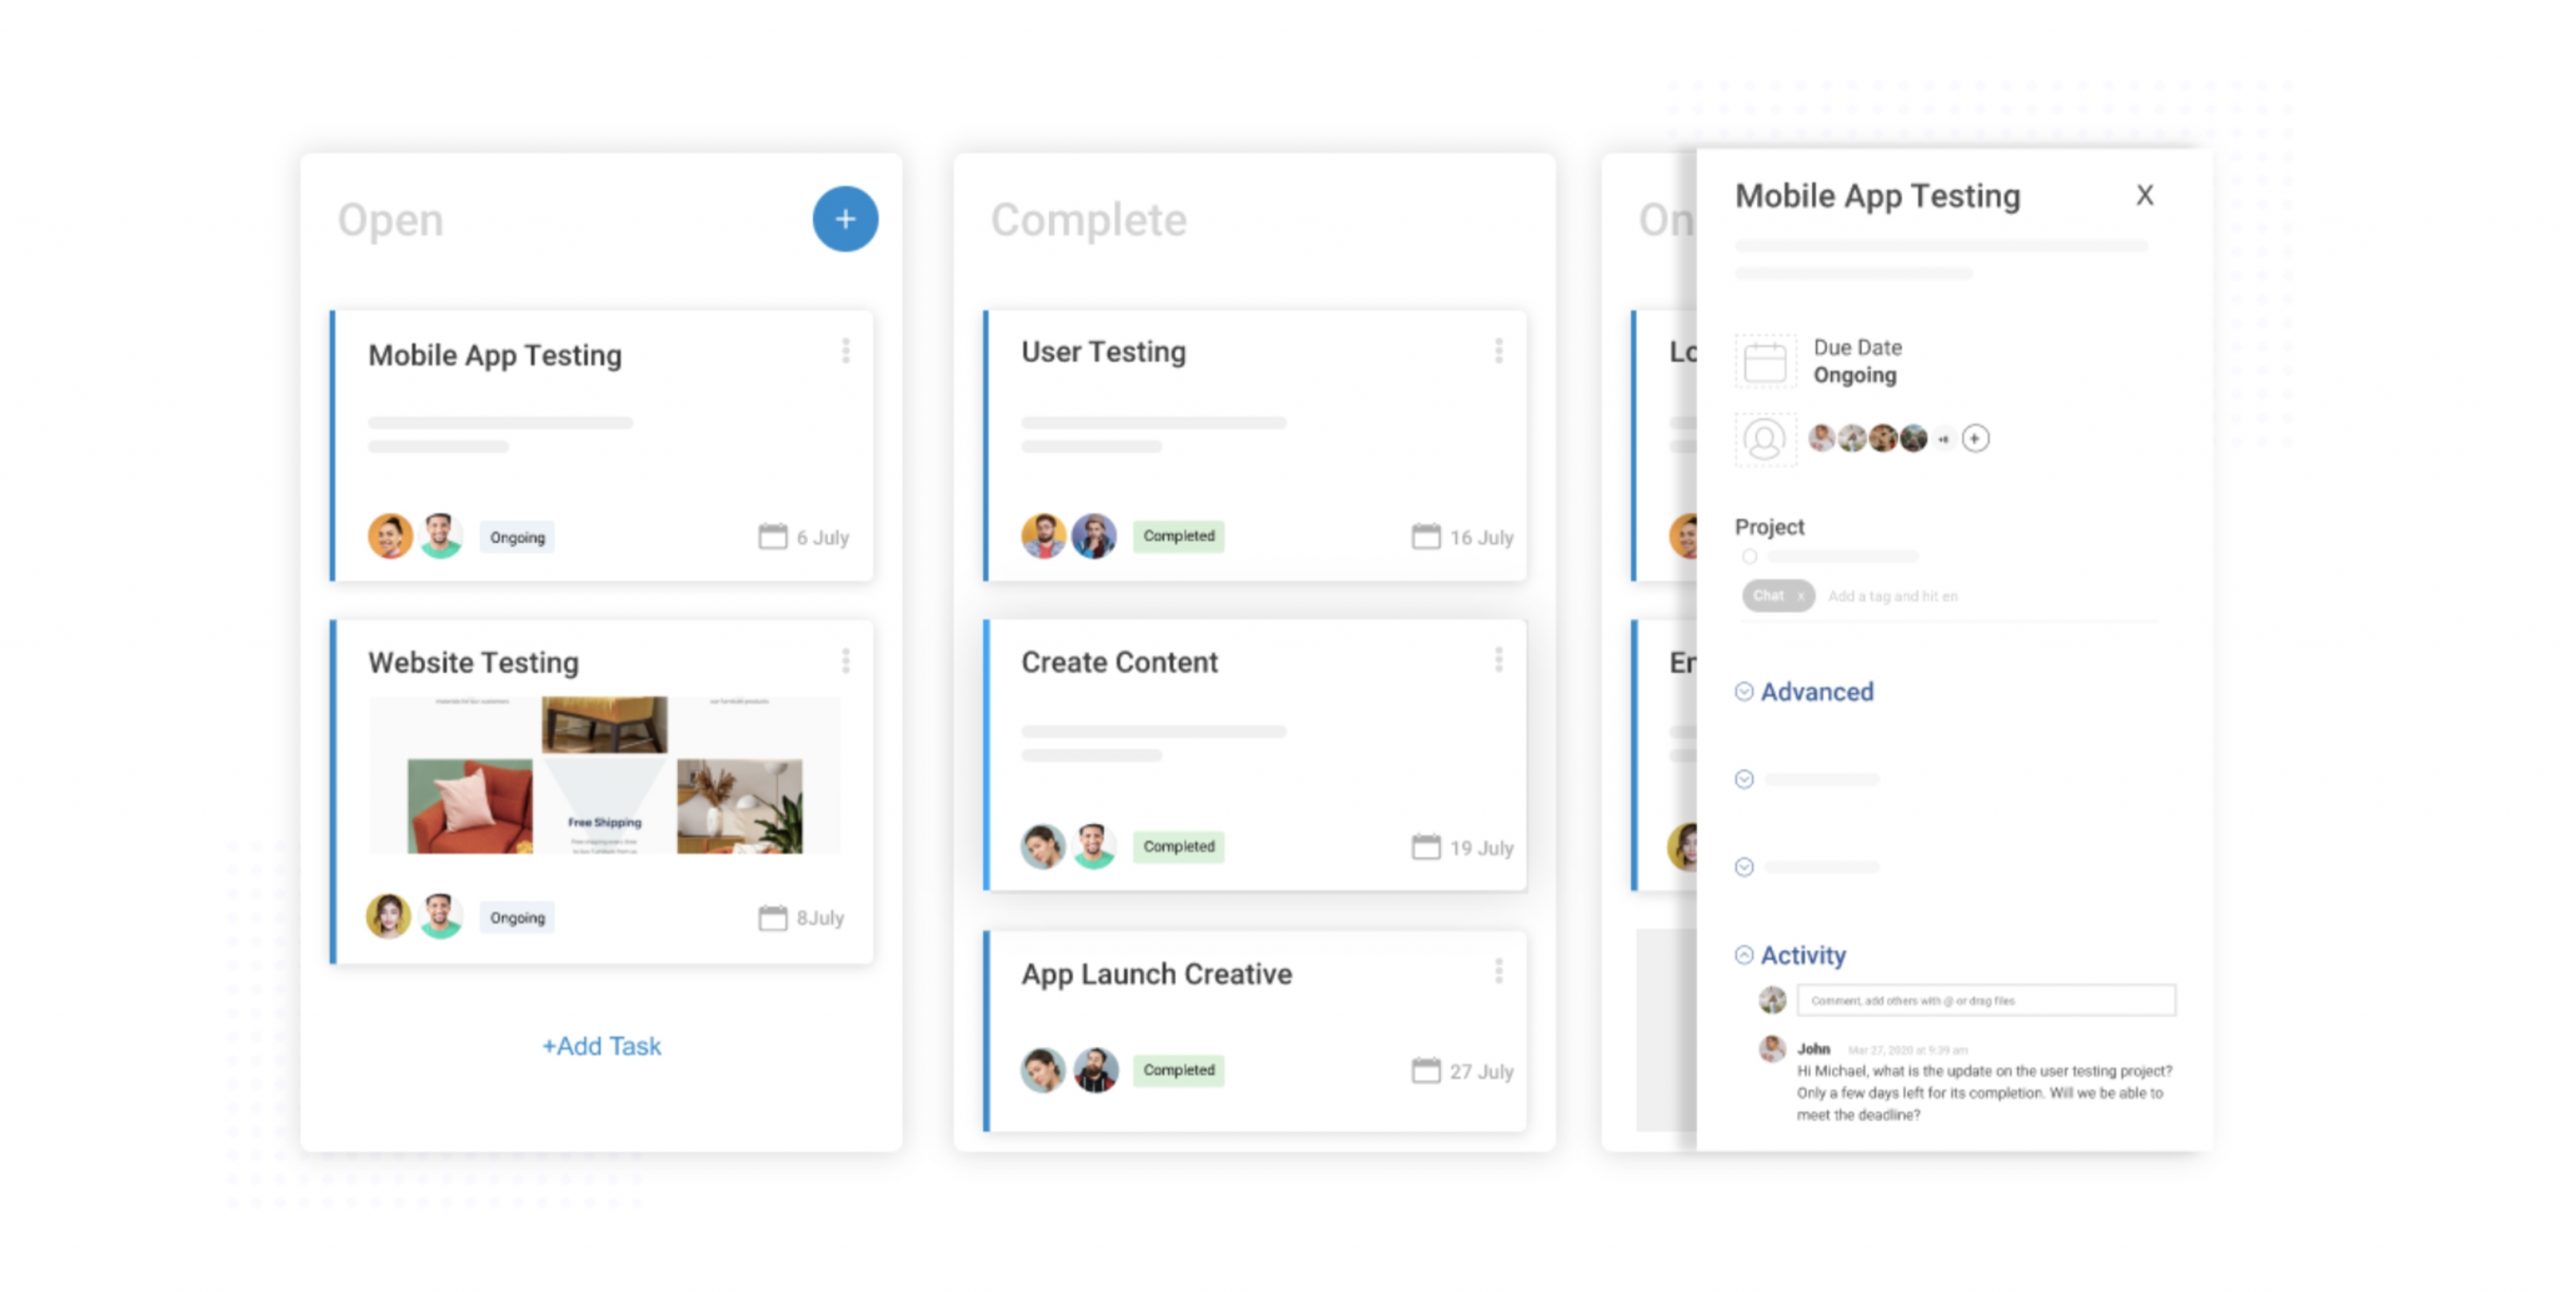
Step 3: Enable Real-Time Collaboration
Smooth collaboration is essential for team alignment on each project and tasks. To ensure that, click on the comment icon against the task you want to collaborate on and connect with the team in real time.

This will open the task’s activity section where you can type “@user’s initials”, choose the user from the auto-suggested list, and add your comment for seamless collaboration. The user will be automatically notified and granted access if not already included.
Step 4: Set Timelines
Click on the “Time” option in the top bar and add a time entry for each task that includes due date and hours.
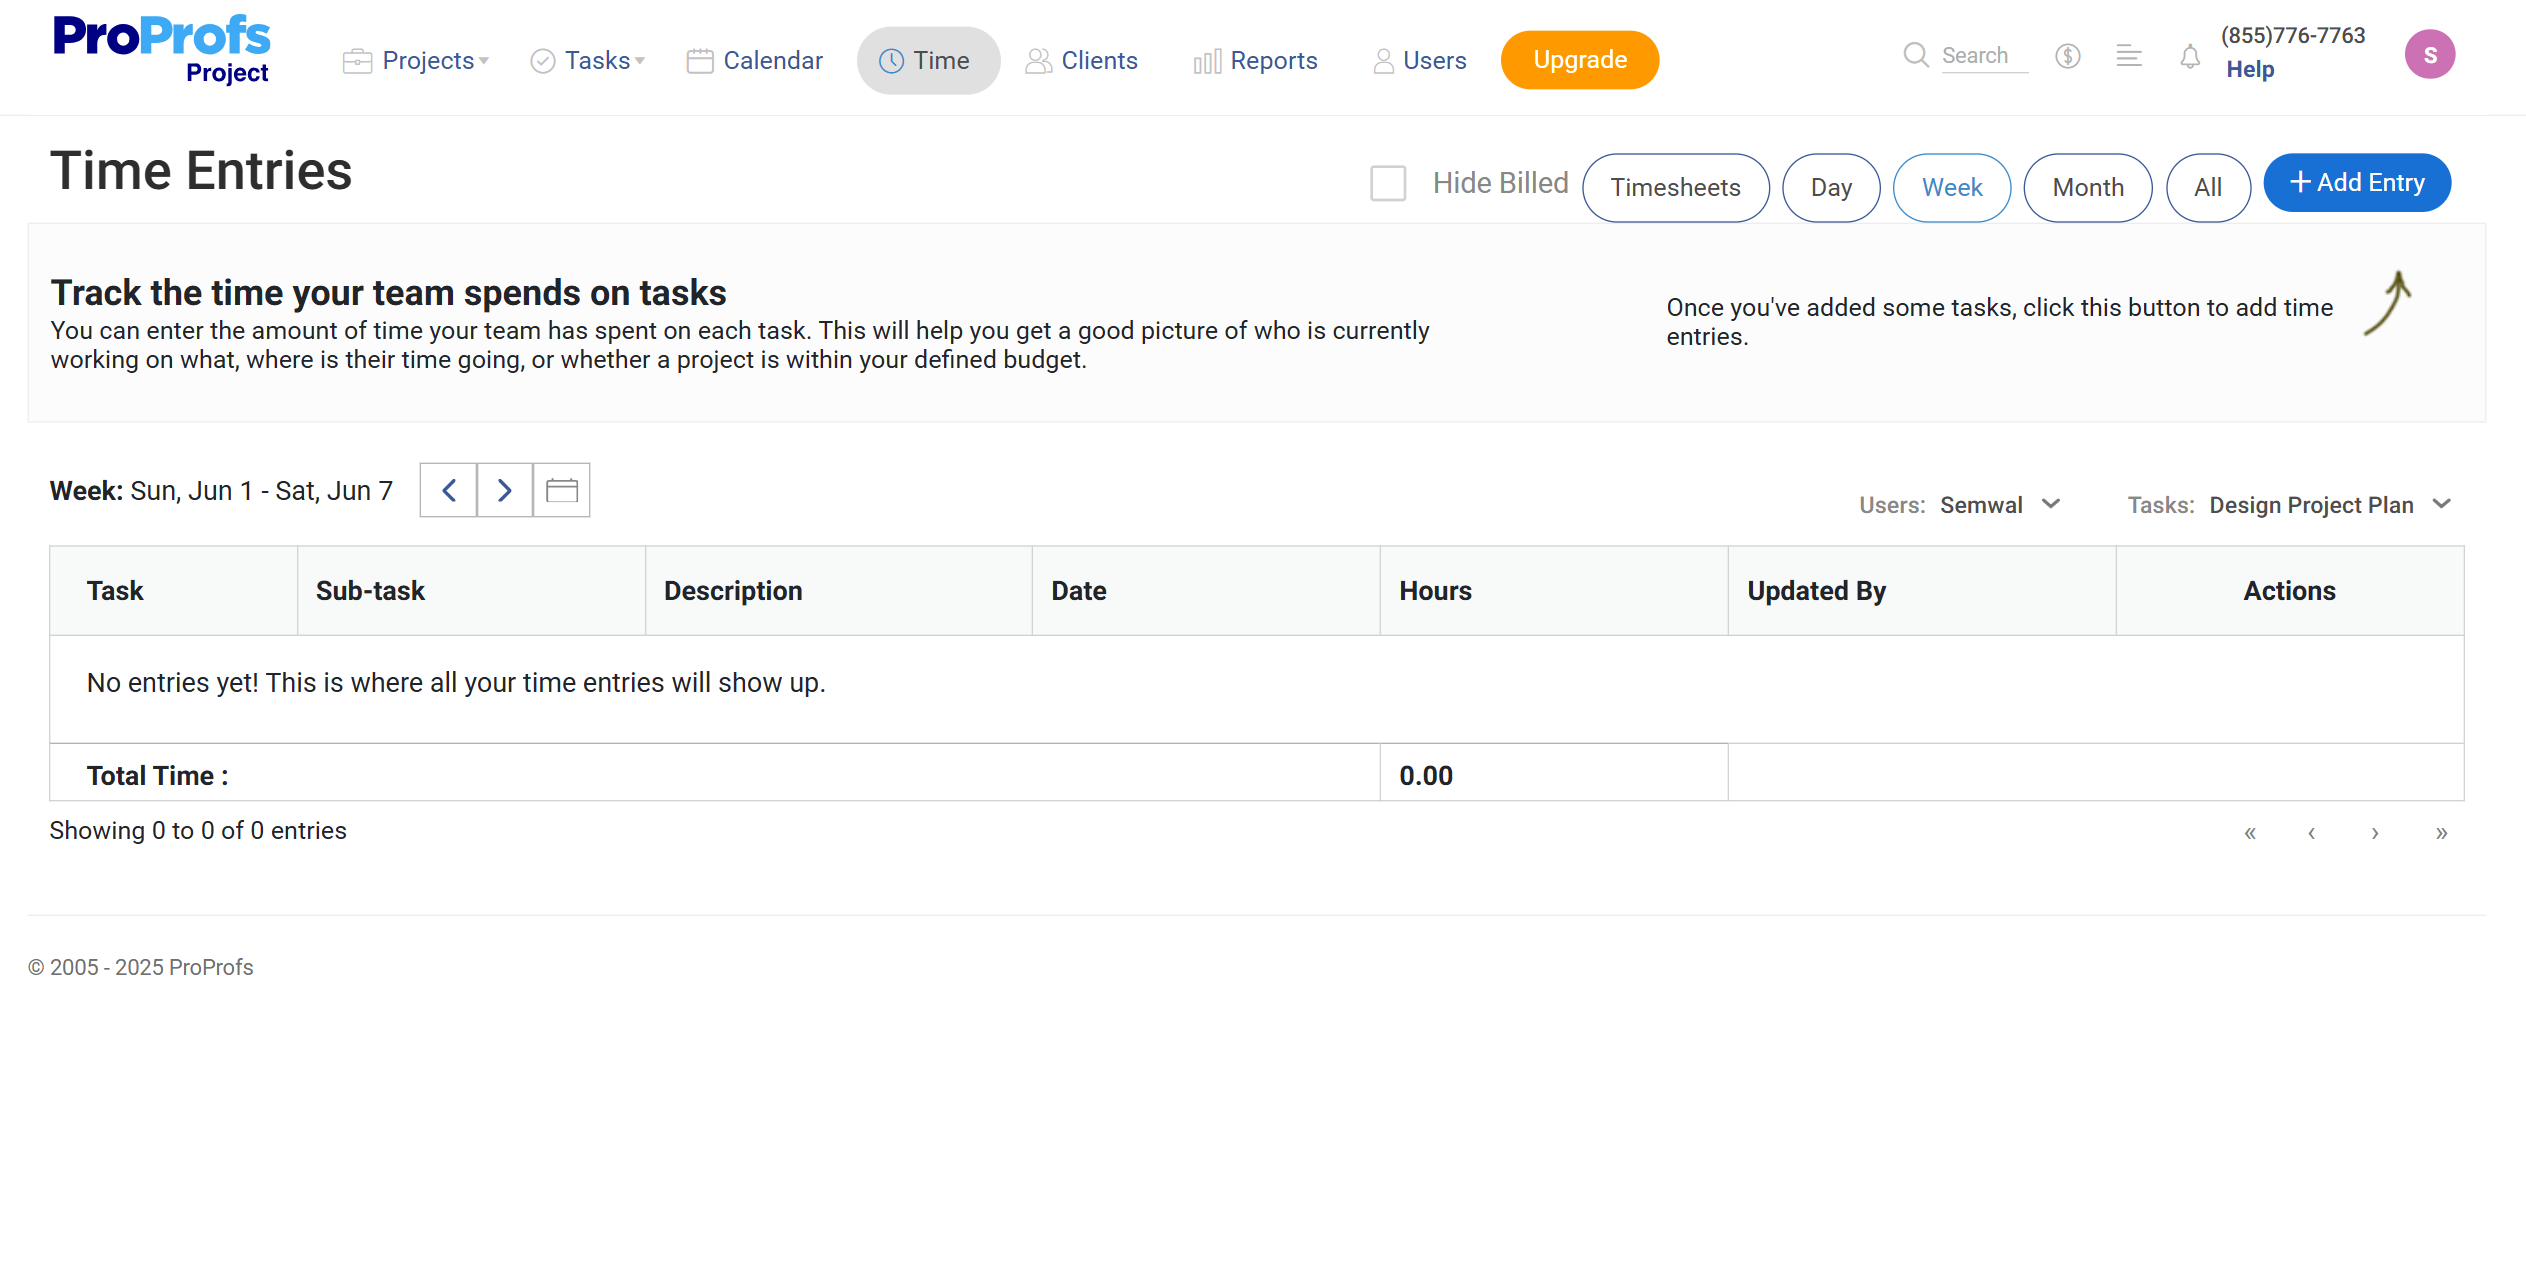
To automate the time tracking process, your team members can simply start or stop the timer clock against the task when they are working on it. This ensures the project stays on track and helps you measure progress.
You can also use a Gantt chart to visualize the timeline and keep everyone organized. Here, tasks are shown with durations, and dependencies are marked with connecting lines to highlight sequence, overlaps, and potential bottlenecks.
Step 5: Create Custom Workflows
Enter the Kanban View from the top bar and click on the three dots to find the custom workflow option. It refers to a sequence of stages a task follows from start to completion.
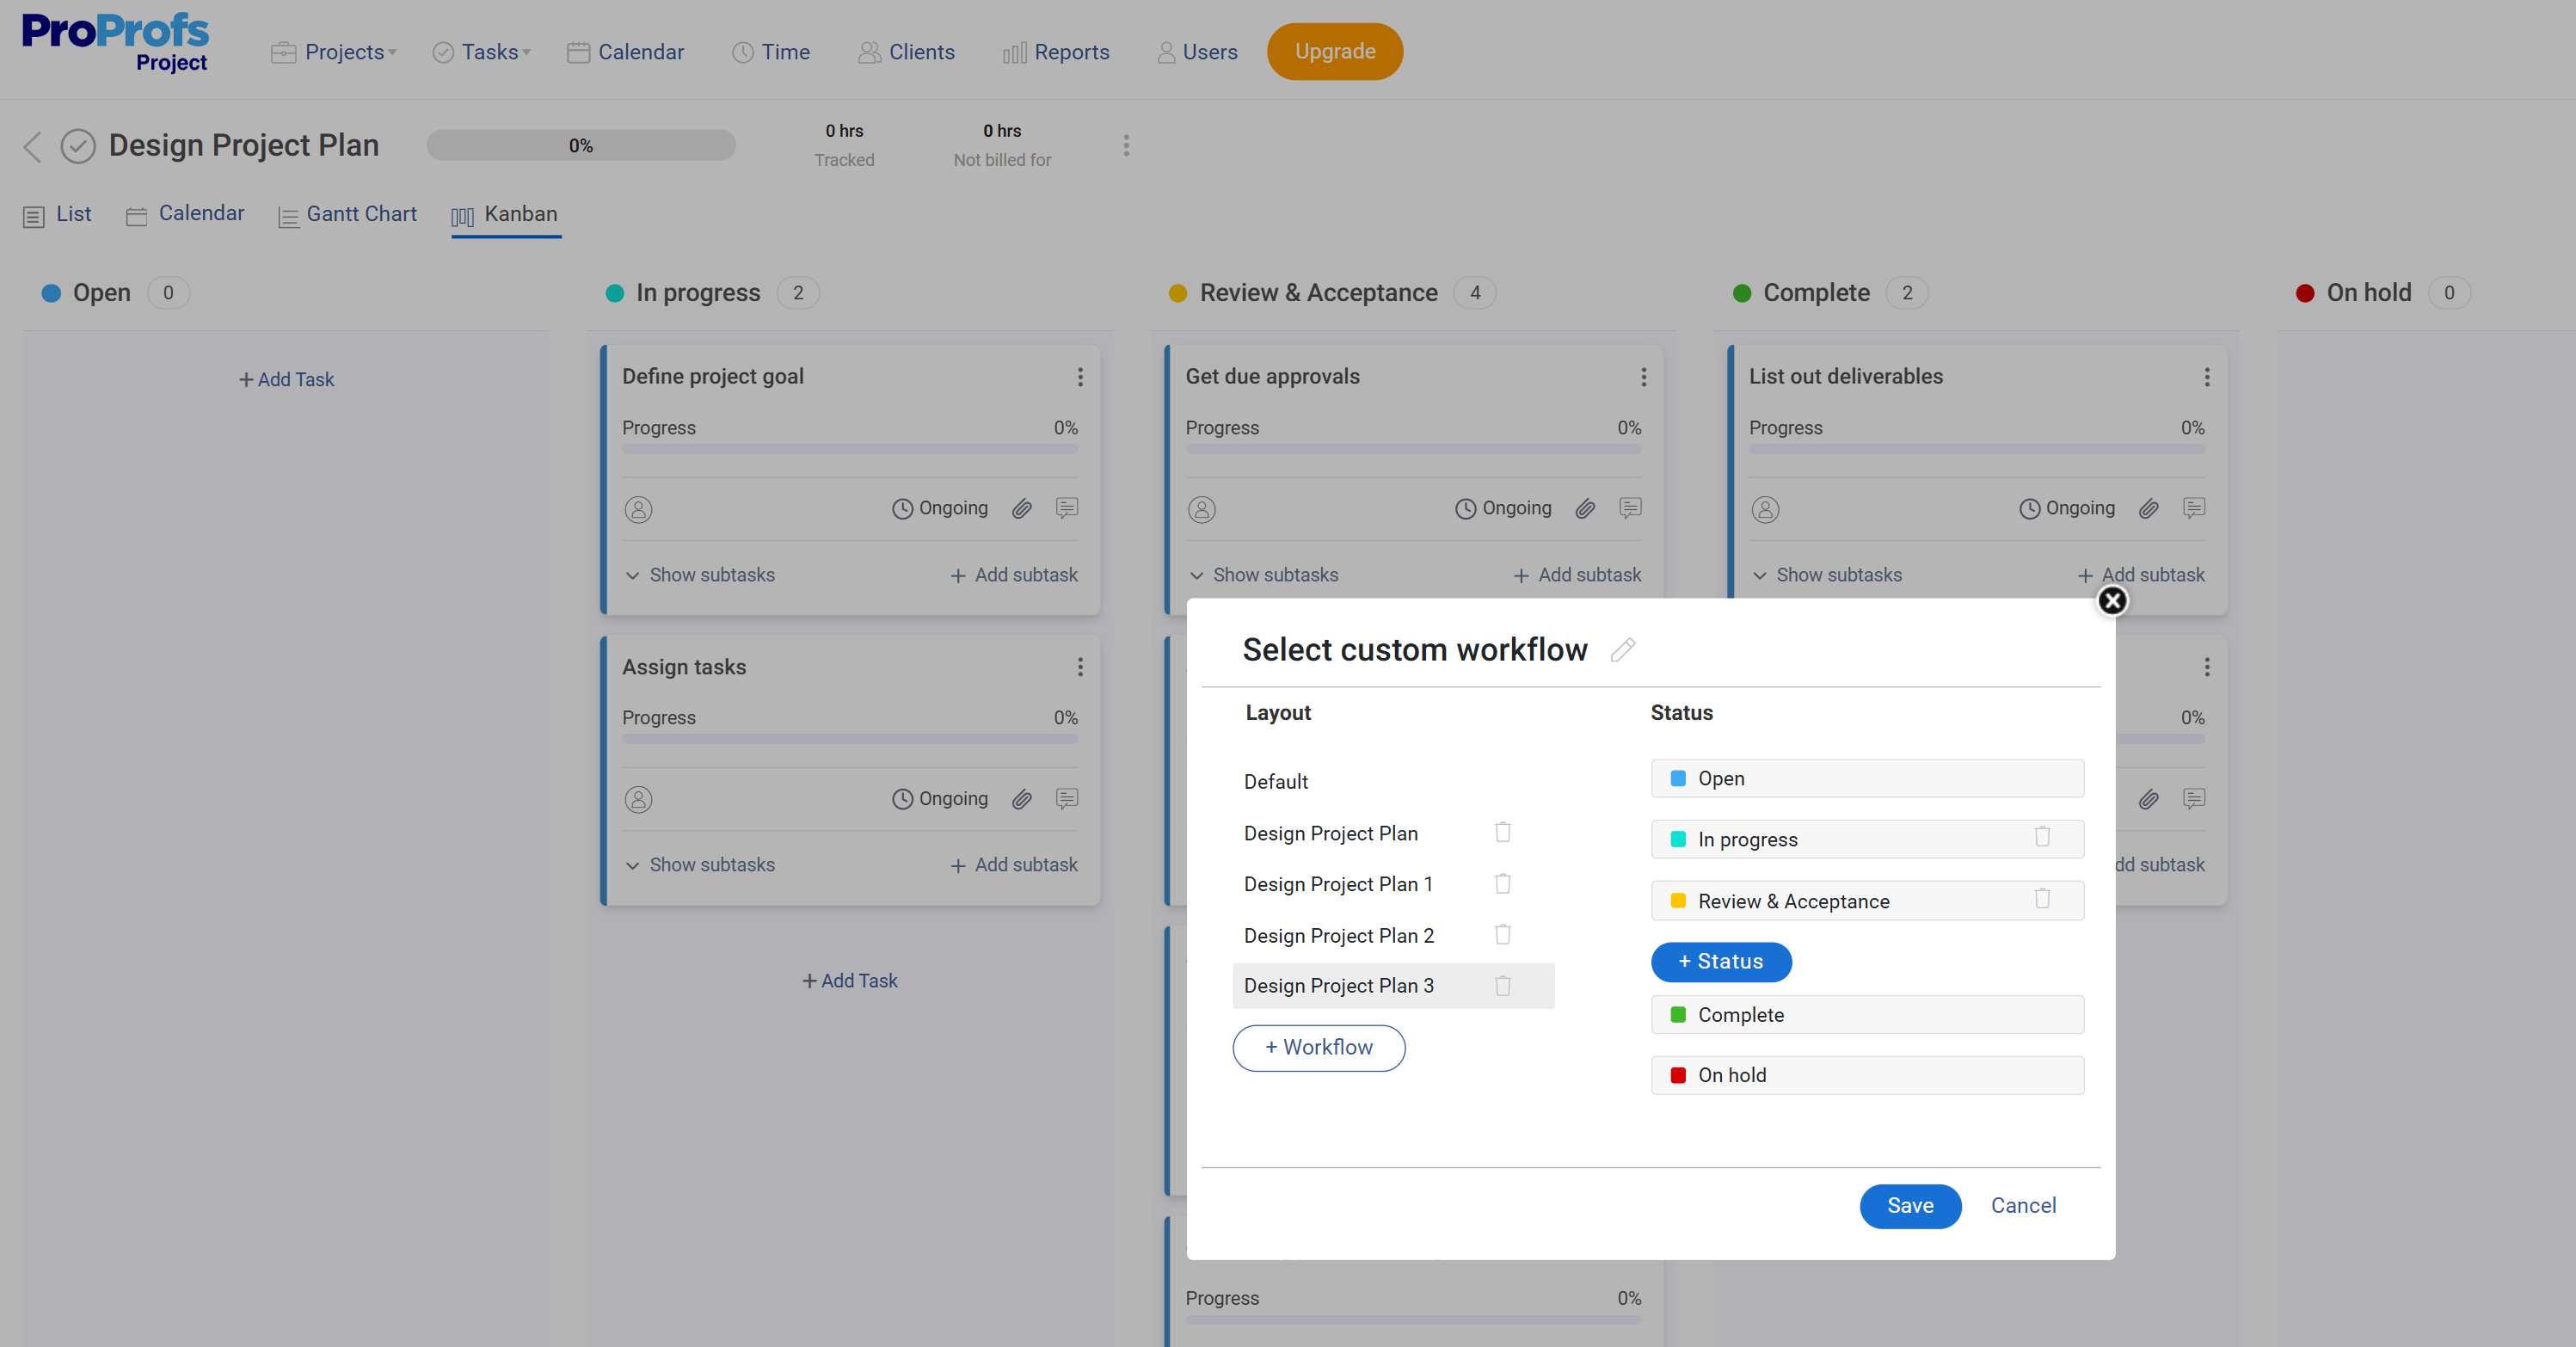
It guides users on what to do and in what order. You can add, edit, or remove approval stages to fit your project needs.
Step 6: Execute, Track, and Optimize the Plan
Now, it’s time to implement the project, monitor progress, and adjust as needed.
The reports section of the top bar provides detailed insights into:
- Open, closed, and overdue projects
- Open, closed, in progress, and overdue tasks
- Graph to gauge created vs. completed tasks to monitor progress
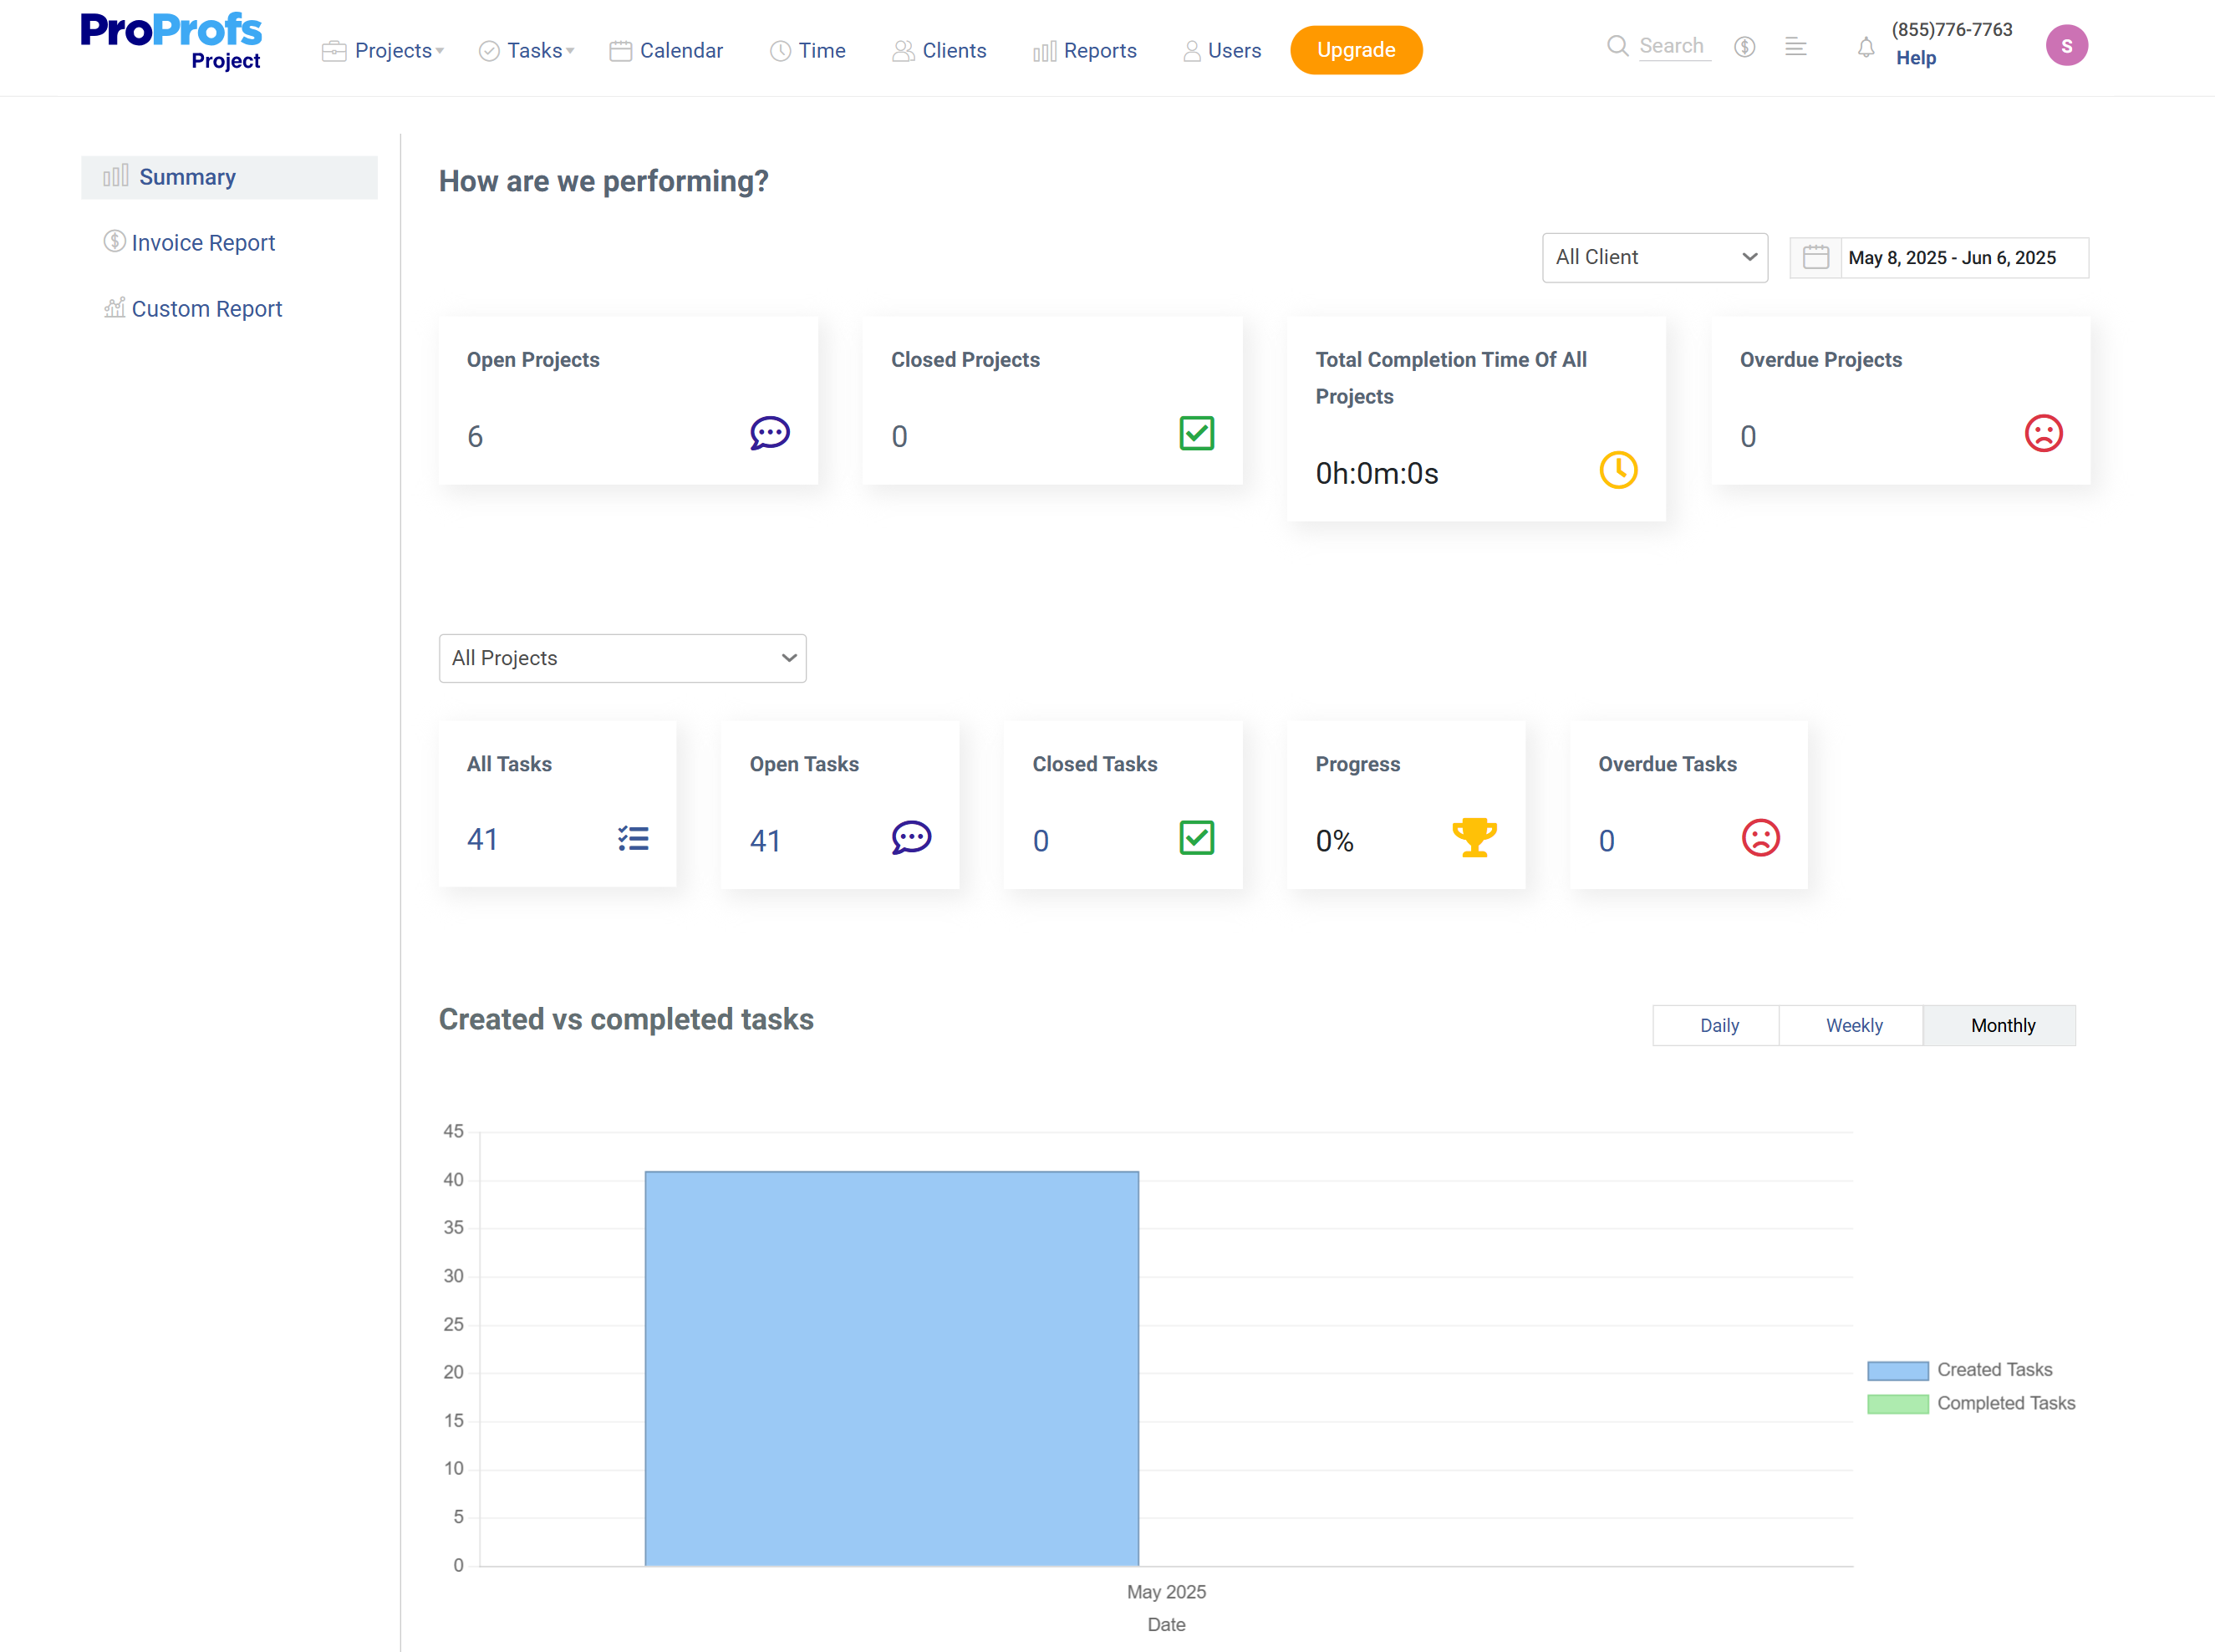
Here, you can even generate in-depth reports to analyze estimated versus actual hours, helping improve project accuracy and planning.
Quick Tip: Use the performance dashboard to spot underloaded or overworked team members. Reviewing task progress and logged hours can help you reassign work, provide recognition, or offer support before issues escalate.
Why Is Project Planning Important?
If you’re looking for a one-shot answer to this question, it will be – the project planning process is the bedrock upon which the entire project stands.
Here are some of the reasons why this phase in the project lifecycle is so important –
1. Reduced Risk of Failure
Meticulous planning helps identify potential roadblocks and challenges before they derail your project. Anticipating risks and formulating mitigation strategies helps in proactively addressing issues and minimizing their impact.
2. Clear Direction & Focus:
The clarity you get after defining the project’s goals, scope, and deliverables ensures everyone involved is aligned on the project’s objectives and prevents scope creep.
3. Improved Resource Allocation
This ensures you have the right people with the appropriate skills assigned to the relevant tasks and that necessary equipment or software is acquired beforehand.
4. Enhanced Communication & Collaboration
When you create an effective communication plan, you ensure everyone is on the same page and gets updated whenever needed.
5. Realistic Expectations & Timelines
Through effort estimation and task sequencing, project planning helps create a realistic schedule that prevents unrealistic deadlines and ensures project milestones are achievable.
6. Cost Control & Budget Management
Budgeting allows you to anticipate and factor in all potential expenses and helps you stay within your financial constraints and avoid cost overruns.
7. Increased Stakeholder Confidence
Clear goals, timelines, and resource allocation demonstrate a professional approach and inspire confidence in stakeholders, vital for securing buy-in.
Turn Project Planning into Task-Level Action
To pave the way for the next phase, project execution, you need to ensure that you have a robust plan in place. Following the project planning steps in this guide is likely to deliver results consistent with the expected project output. But something that is more likely to increase your chances of success is…
Getting the right project planning and management software. If you aske me, I suggest using a tool like ProProfs Project as it offers a sensitive balance of clean UI, advanced features (resource management, reports, automation, etc.), and flexible pricing.
If budget is a concern or you want to test the tool before making an investment, you can also consider the freemium plan.
Frequently Asked Questions

How do I estimate time and resources for a project?
Break down your project into smaller tasks (Work Breakdown Structure). Then, estimate how long each task will take and who or what is needed to complete it. Use past projects as a reference, and consult your team for realistic input. Add a time buffer to handle delays or unexpected issues.
How long should it take to create a project plan?
It depends on the project’s size and complexity. For small projects, it may take a few hours to a day. For larger ones, step-wise project planning can take a few days to a week. Using ready-made templates and project planning tools can speed up the process.
What are the most common project planning mistakes?
- Vague objectives
- Underestimating time or costs
- Ignoring risks
- Not involving the team in planning
- Skipping regular check-ins and updates
Clear communication, detailed task breakdowns, and regular reviews help avoid these issues.
How do I prioritize tasks when everything feels urgent?
Use methods like the Eisenhower Matrix or MoSCoW (Must-have, Should-have, Could-have, Wont-have). Focus on tasks that impact deadlines or goals the most. Assign deadlines and dependencies in a planning tool to visualize what needs attention first.
FREE. All Features. FOREVER!
Try our Forever FREE account with all premium features!